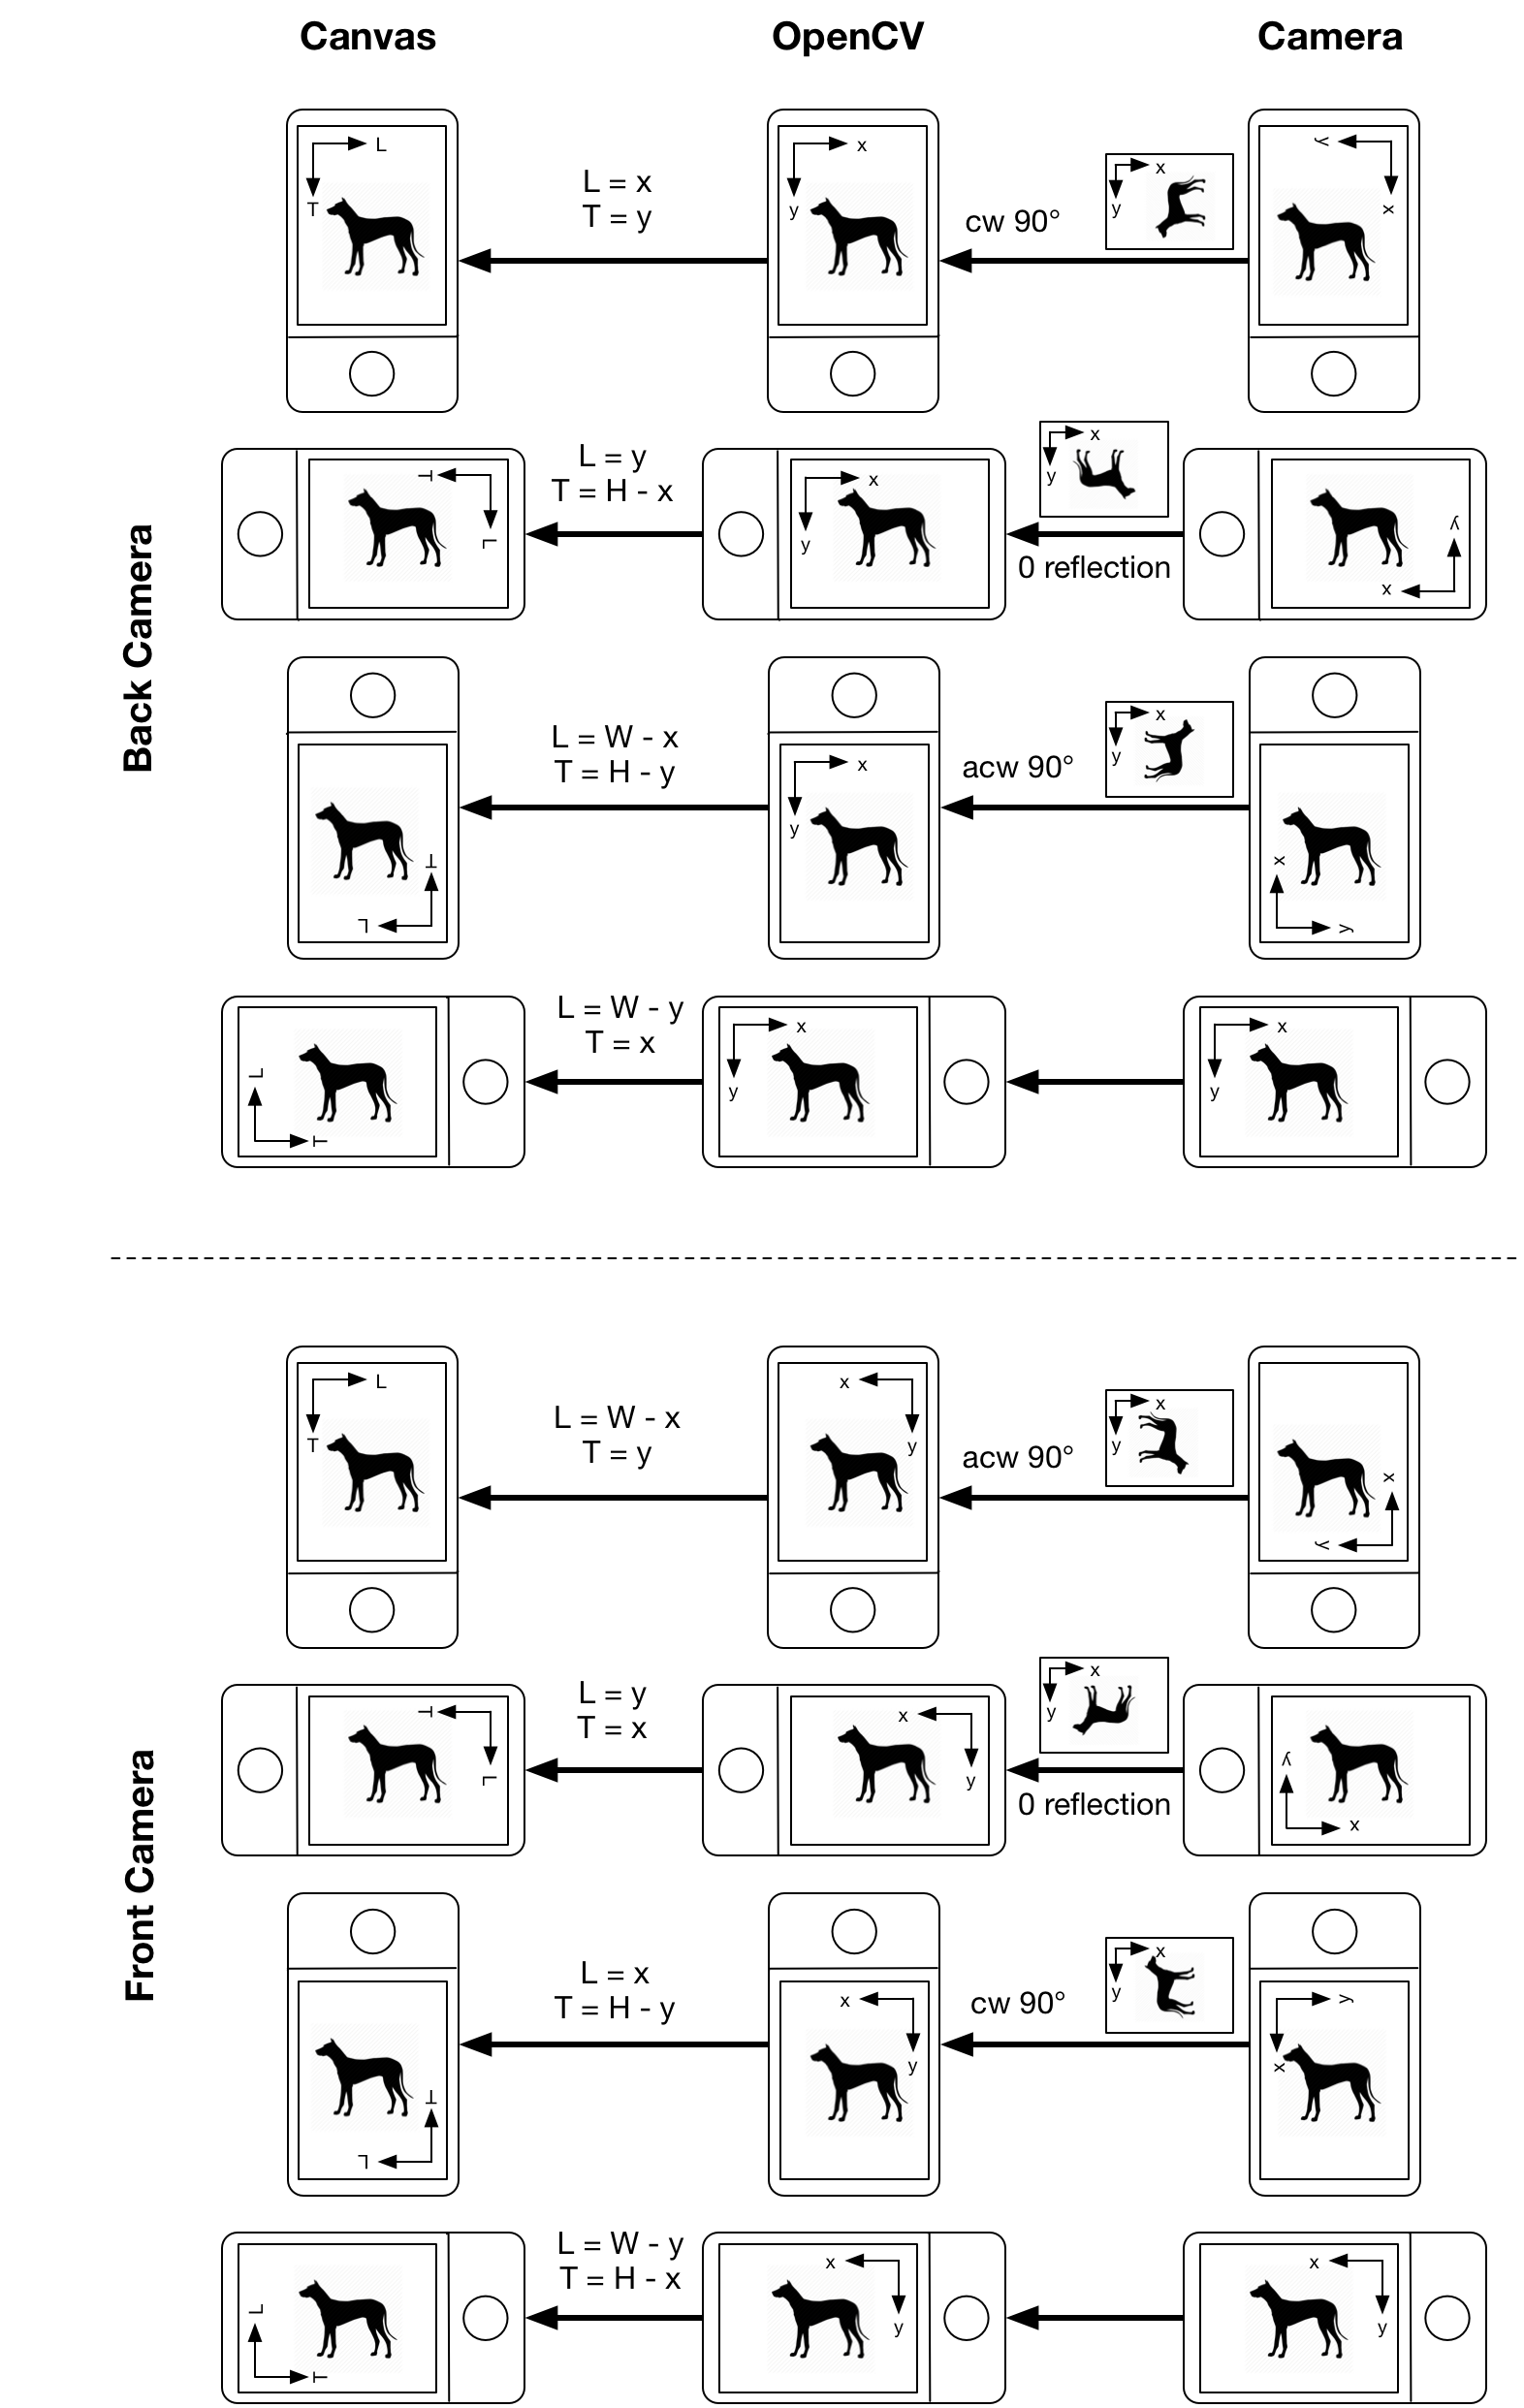
This tip is about camera related coordinate system in android. When i develop camera related apps, inside onPreviewFrame() i need to do image processing on byte[] data and show results on top of the canvas and i use OpenCV for the image processing in jni. So the whole workflows is from byte[] in android camera to cv::Mat() in jni OpenCV and after image processing from cv::Mat() to android canvas and draw results.

There are two things which affects the transformation, camera index and phone orientation, let's say using front1back0 to denote camera index, and using orientCase to denote phone orientation, orientCase equals to 0,1,2,3 corresponds to  ,
,  ,
,  ,
,  .
.
Things to note:
- canvas coordinate system is always fixed
- android camera coordinate system only depends on
camera index - when using front camera, imaging you are another person who is using your phone to point at you (in other words the other person is using the back camera to look at you), that explains how camera coordinate system differs when camera changed in the above figure
- when plot on canvas, also need to take status bar height, menu bar height, and maybe some other component's height into considerations, the
(L,T)coordinates shown above can not be directly used unless the image is exactly the same size of canvas(no menu bar etc.), otherwise there are some scaled ratio in both L and T direction to be considered so that processed results from OpenCV can be displayed properly.
I use the following snippet to get content size and scaled ratio:
    @Override
    public void onWindowFocusChanged(boolean hasFocus) {
    super.onWindowFocusChanged(hasFocus);

    Rect rect = new Rect();
    getWindow().getDecorView().getWindowVisibleDisplayFrame(rect);
    View v = getWindow().findViewById(Window.ID_ANDROID_CONTENT);

    viewHeight = v.getHeight();
    viewWidth = v.getWidth();
    scaleH = viewHeight * 1.0 / size.width;  // size is the camera preview size (or the cv::Mat size)
    scaleW = viewWidth * 1.0 / size.height;
    Log.i(TAG, "Status bar height: " + Integer.toString(rect.top) +
               ", Content Top: " + Integer.toString(v.getTop()) +
               ", Content Height: " + Integer.toString(v.getHeight()) +
               ", Content Width: " + Integer.toString(v.getWidth()) +
               ", Content / CameraView ratio H: " + scaleH +
               ", Content / CameraView ratio W: " + scaleW);
    }
Then (L,T) should multiple scaleW and scaleH before draw on canvas.
From android camera to OpenCV in JNI: as shown above, the raw android camera image byte[] array passed to jni is usually not what we thought it should be, so we need to do some tweaking so that OpenCV sees what we thought it should see. I use the following snippet to do this:
    switch (orientCase) {
        case 0:  // cw90 for back cam, acw90 for front cam
            transpose(m, m);  // m is the Mat after converting jbyte[] data from YUV420sp2BGR
            flip(m, m, 1-front1back0);
            break;
        case 1:  // 0 reflection for both cam index
            flip(m, m, -1);
            break;
        case 2:  // cw90 for front cam, acw90 for back cam
            transpose(m, m);
            flip(m, m, front1back0);
            break;
        default:
            break;
    }
Now there is another issue of how to get the orientation, there are two ways of doing this:
- use
ACCELEROMETERandMAGNETIC_FIELDsensors fromSensorManager, and getazimuth,pitch, androllvalues from sensor results. However i found it too difficult to useazimuth,pitchandrollvalues to define orientation properly, see this StackOverflow question, there is another useful tutorial. The following snippet only shows how to getazimuth,pitchandrollvalues
    @Override
    protected void onCreate(Bundle savedInstanceState) {
        sm = (SensorManager) getSystemService(Context.SENSOR_SERVICE);
        aSensor = sm.getDefaultSensor(Sensor.TYPE_ACCELEROMETER);
        mSensor = sm.getDefaultSensor(Sensor.TYPE_MAGNETIC_FIELD);
        sm.registerListener(sListener, aSensor, SensorManager.SENSOR_DELAY_NORMAL);
        sm.registerListener(sListener, mSensor, SensorManager.SENSOR_DELAY_NORMAL);
    }

    private void getOrientation() {
        float[] values = new float[3];
        float[] R = new float[9];
        SensorManager.getRotationMatrix(R, null, accelerometerValues, magneticFiledValues);
        SensorManager.getOrientation(R, values);
        values[0] = (float) Math.toDegrees(values[0]);
        values[1] = (float) Math.toDegrees(values[1]);
        values[2] = (float) Math.toDegrees(values[2]);
        Log.i(TAG, "azimuth, pitch, roll: " + values[0] + ", " + values[1] + ", " + values[2]);
    }

    final SensorEventListener sListener = new SensorEventListener() {
        @Override
        public void onSensorChanged(SensorEvent event) {
            if (event.sensor.getType() == Sensor.TYPE_MAGNETIC_FIELD)
                magneticFiledValues = event.values;
            if (event.sensor.getType() == Sensor.TYPE_ACCELEROMETER)
                accelerometerValues = event.values;
            getOrientation();
        }
    };
- android provides a much easier solution
OrientationEventListener, it can directly get orientation (0-360°) from itsonOrientationChanged(int orientation)function, the following snippet shows how to getorientCaseusing this method
    @Override
    protected void onCreate(Bundle savedInstanceState) {
        mOrientationListener = new OrientationEventListener(this,
                SensorManager.SENSOR_DELAY_NORMAL) {
            @Override
            public void onOrientationChanged(int orientation) {
                if ((orientation >= 0 && orientation <= 30 ) || (orientation >= 330 && orientation <= 360)) {
                   orientCase = 0;
                } else if (orientation >= 60 && orientation <= 120) {
                    orientCase = 1;
                } else if (orientation >= 150 && orientation <= 210) {
                    orientCase = 2;
                } else if (orientation >= 240 && orientation <= 300) {
                    orientCase = 3;
                } else {}
                //Log.i(TAG, "Orientation changed to " + orientation +
                //        ", case " + orientCase);
            }
        };
    }

    if (mOrientationListener.canDetectOrientation() == true) {
       mOrientationListener.enable();
    }
Don't forget to do sm.unregisterListener(sListener) (if use 1st method) or mOrientationListener.disable() (if use 2nd method) in onPause() so that these sensors also pause when the MainActivity pauses.